Watch the Interactive Video - Best Practices Video
Total running time: 13:57
Overview
This article will look at those best practices you should incorporate into your workflow when creating an Interactive Video. The article is split into three sections:
- Examples - What is possible on the Idomoo platform
- How it works - A short explanation of the workflow used to create an Interactive Video
- Best Practices - The ideal way to approach the creation of your Interactive Video
Examples
Idomoo releases new features on a regular basis, and while the current feature set does not limit you to just the following examples, here are some of the most common forms used within the Interactive Video experience.
If you would like to see further examples, please click here, then click the ‘Living Video’ button.

Menu Bar: Scene-Selection
In this example, the Interactive video contains a Menu Bar, typically at the top, which can be used by your viewer to select a topic and jump to that area of interest at any time. These options remain constantly available to the viewer while the Interactive Video is playing.
Choose Your Own Adventure: Scene-Selection
Choose your story, sometimes referred to as ‘Choose Your Own Adventure’, is a system that allows the viewer to click on a prompt, or question. This click takes the viewer to a specific scene that attempts to provide the viewer with greater clarity on whatever issue they are facing.
This is similar to the older style adventure books where the player would encounter a dragon and be given a choice; run away (turn to page 90), stay and fight (turn to page 300). This ‘gamification’ of the Interactive Video experience is a very powerful tool, one that allows the viewer to create their own interactive experience with your video. In doing so, it can also provide them with the answers they were looking for in a streamlined and easy to use fashion.
Links To The Web
This feature allows you to create a Call to Action button linking the viewer to a target page on the internet. This can take the viewer to a login page, allow them to download an app, or direct them towards any other relevant piece of information, such as a companies T&C’s.
How It Works
This section takes a brief look at the basics of how to create an Interactive Video. Full explanations of each function can be found in the Idomoo Academy.
Menu Bar
Any scene that you have created can be turned into an interactive ‘chapter’ which will be displayed on the Menu Bar. This allows the viewer to click whichever scene they wish to view in the order they wish to view them.
When you name a scene in Storybuilder, that will be the name that appears in the Menu Bar, so some pre-planning is recommended.
Where possible, keep the names short and to the point to allow room for multiple chapters on the same menu bar. If chapter names are too long to fit inside the allocated space, the bar becomes scrollable, but where possible, this should be avoided to enhance the optimal interactive display of your video.
Tips:
- You can decide which scenes are included or excluded from the menu bar using Storybuilder
- The look of the bar may vary on different screen sizes - Including Mobile vs Desktop
What Can Be Interactive?
Any placeholder in your video can be turned into an interactive clickable event. The examples below show (from left to right) a simple Button as the interactive point of interest, the image of a shoe, and a section of highlighted text as something that can be clicked in order to move the viewer onto another point in your video.
 |  |  |
Even video inside of your video can be made clickable. In this case the viewer can hear the question being asked, and click on the answer most relevant to them.
Timeouts
The option of a timeout in your video exists to plan for the situation where the user does nothing. In this case, options exist to move the video forward, to end play, or continue looping indefinitely.
No Timeout: If you select this option, the video will play indefinitely until the user makes a selection. This is best used when there are no default options available, such as SKIP.
Option selection after Timeout: in this option, you can decide which option will be selected if the user fails to make a choice within a defined time period. In this case, it is best to add a visual countdown, which communicates to the viewer how much time they have to make a selection.
In the example below, you can see a Timeout indicator appears after a few seconds, visually indicating that a selection is required in the next five seconds, or a selection will be made for the viewer. In this case, the predefined selection is to SKIP to the next category.
Timeout Display Options
Timeout indicators are available in various forms, including a circular wheel, and a linear progress bar.
When using this type of Countdown Indicator, give the user some time to evaluate their choices (ideally around 5 seconds) in order to reduce the feeling of being pressured into making a decision.
If the user does not make a selection after this delay, then it is acceptable to begin the Visual Countdown Indicator. If the countdown ends and the user still has not made a choice, then a default selection, predefined by you, should be selected.
This default selection is easily conveyed to the viewer by incorporating the countdown indicator inside the button.
- Remember: Regardless of the type of countdown indicator you choose to use, always include a SKIP button
How best to use a Timeout Indicator
Once a Timeout Indicator has finished, the default selection is used. It is best if the default selection is highlighted during the countdown in order for the viewer to be aware that this choice will be selected if they do nothing.
This can often be the first button on the list, but SKIP is also a clear option if available.
Infinite Loops
The infinite loop takes the viewer back to the main menu after they have made a selection. In the example below, the viewer can choose any of the three videos, and after viewing that video, they are returned to the start menu with the option of viewing a different video, or replaying the same one.
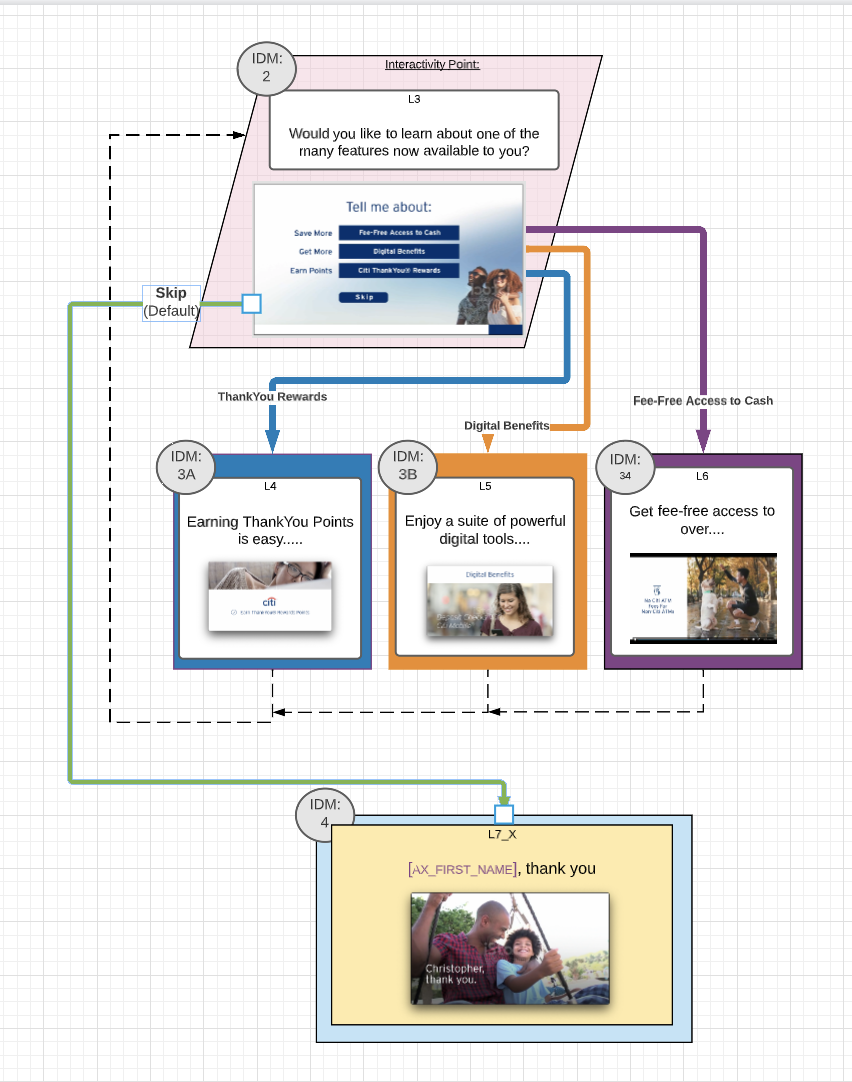
This is an infinite loop option and can only be broken if the viewer clicks on a skip button, taking them away from the start menu and to a different menu, in this case, a Thank You and Goodbye screen.
Any interactive video that features an infinite loop should also include a Skip button. This can also be set as the default button, which is selected after a timeout period has passed.
Summary
- Give the viewer an indication of what to do - Interactive Video is still relatively new, so it is a good idea to prompt the viewer for the action you wish them to take.
- Include a Countdown timer - If your video has a timeout that makes a selection for the viewer, display a countdown timer after a few moments, and highlight the default selection that will occur without interaction.
- Include a skip button for infinite loops - Always give the viewer a way to exit an interactive video that uses an infinite loop, to avoid them being trapped and forced to close the video in order to escape.
- Make sure the Skip button is visible - Skip buttons should always be highly visible and not tucked away where the viewer needs to hunt for it.
Best Practices
When introducing an interactive video to the viewer, it’s important to manage their expectations by introducing an interactive decision point early on in the flow of the video. A great way to do this is with the addition of a Start Now moment that appears at the very beginning of your video.

This early interactivity helps train the user; you are showing them this isn’t a passive video experience, but one where they need to be an active part in the path the video takes.
As mentioned earlier, interactive videos are still relatively new and some audiences will need to be introduced to their capabilities, with prompts for the required action appearing as soon as possible.
In Button Countdown Indicators
One of the best ways to steer the audience towards the required action is via an In Button Countdown Indicator. This is a very specific countdown tool that indicates which action will occur if the viewer makes no choices.
An example of this would be the “Next Episode” or “View Credits” choice of interactive buttons often used by streaming services, such as Netflix.
|
|


Size Really Does Matter
When working on the placement and size of the buttons in your Interactive Video, some consideration should be given to creating as large a button as possible. In fact, you should consider that it is very hard to make the buttons too big, however, making them too small is all too easy. This can often happen when you try to cram as much info into the display as possible.
- Think: Small Screen & Big Fingers don’t always mix
- When in doubt, make your buttons bigger than you think they should be

Make Sure Your Buttons Are Clearly Clickable
When working with a limited audience attention span, it’s important they realize, as quickly as possible, that the video contains buttons they can click on. You can achieve this by following these best practice tips in order to train your audience into what is a clickable button:
- Don’t force your audience - To guess what is and what is not clickable
- Make Buttons look like Buttons - Avoid a design that might be confusing
- Include text that directs the viewer - Click Below or Make Selection
|
|
|
|


In the examples above, the left image contains shoes, which are clickable, but may not be immediately recognizable as buttons to your viewer. On the right, the buttons are clearly buttons and will be instantly recognizable as such. This example also contains text that directs the viewer to click on the buttons below, without using the word ‘Buttons’.
Effective Use Of Placeholders
In After Effects, using Idomoo's plugin for After Effects called Scene Builder, you can position your placeholders in a variety of different ways. It is recommended to set the size of the text bounding box to the full desired area of the button and not just the text.
- Note - this can also be achieved by adding a transparent PNG as the top layer and making that the interactive placeholder.
|
|


Positioning & Layout
Always be aware of the position and layout of your on screen menus and buttons. Never place buttons where the player controls will be, and always leave a safe space around your layout, staying away from the very top and bottom of the work area.
|
|
|
|


This creates a pleasant user experience, but you do need to check if the positioning and layout works on all formats; particularly mobile platforms.
- Best Practice: Move the video progress bar to be below the video, instead of overlaying it. This can easily be achieved using Page Creator.
Animating A Skip Transition
When the viewer skips to a new scene, due to the technical limitations of individual internet connections, the timing of the jump may not be precise. On average, the delay may be 0.5 seconds before or after your intended skip time. This can result in a jumpy looking animation, however, you can compensate for this with the correct transition workflow.
As a best practice, it is recommended that:
- At a scene’s conclusion, there is a hold (animation that is either still or very subtle) for a period of around 1.5 seconds.
This will help compensate for an imprecise jump timing and avoid a jumpy looking animation.
Jumping To Scenes With Logic
By default, you can not jump to a scene that contains logic statements, as they are blocked due to the system not being aware of what to do if the scene jumped to did not exist due to logic constraints. To avoid any limitations caused by this issue, please consider the following methods:
- Try to avoid logic on scenes you know in advance you would need to jump to by:
- Adding a single scene to a group, and adding the logic on the group level only. Then, when choosing the “Jump to” option, choose the scene name from the dropdown list.
- Adding a few scenes to one group.
- Then choose the “Sequence” group type.
- And finally, add the logic on the group level.
- Remember - No logic on any of the scenes in this group, including no “Alternative” group type option.
- Then choose the “Sequence” group type.
- Duplicate the scene (make sure to rename it to distinguish it from the original). Then, add each single scene to a group (as mentioned on #1). Set the jump option to the relevant scene.
Tips & Tricks
The following is a short, non-extensive list of Tips & Tricks to be used when creating your own Interactive Video. More details on all of the features available to you can be found in the Idomoo Academy.
- Interactive features only work with Idomoo Player 2.0
- Consider a menu scene to make it easy for your audience to navigate the video
- Use a color coded flowchart to plan out your Personalized Video project

- Be sure to add default actions for all your interactive elements, and consider what will happen when a viewer doesn’t make a selection
- Fill in the analytics event name or tag to allow player action to be tracked in the Idomoo analytics dashboard